Saturday, May 24, 2014

How To: Make a Child's Nightgown from an Adult T-shirt


     So I started this project because children's nightgowns have become very thin and cheap in my opinion. Every time I go to the store to buy something I look at the nightgowns and decide against purchasing and always saying " I could make that" in my head. Problem is, I usually don't get around to actually making it. I am proud to say this is the one time I came home on a full speed mission.
 
     This project took me 3 hours (with many little interruptions). I would estimate it could go together within an hour based on your sewing speed. I started with a nightgown that we bought a while ago. I used this as my pattern. I also grabbed an old t-shirt that I would have been donating.
 
 
Supplies You will need:
 
Scissors, Straight pins, a ruler, Child's nightgown for pattern, t-shirt, sewing machine, (serger optional)


     The great thing about t-shirt material is that it will not fray on you so you really don't need a serger but you can certainly use one if you have one.
 
 
Let's Begin!!!


     First you will want to make sure your child size nightgown will fit within your t-shirt size. This t-shirt was an adult medium. next cut off the sleeves and cut down the sides (as close to the seam as you can so it's not uneven). Then separate just the front piece. Line up the neck (the front neckline of the nightgown) to the neck line of the t-shirt. You will be using the original neck to avoid having to finish off your new nightgown!!Make sure the shoulder line is touching the shoulder of the original t-shirt (even if only at the corner of the neck). Next fold in the sleeves of the nightgown down to the
arm hole seam. Cut around this (one) side of the night gown from the shoulder- through the arm hole and down to the bottom at the side. Leave about 1/2" seam allowance all the way around the nightgown. SAVE YOUR SCRAPS!!You will need little extras for later, don't throw anything away until you are completely done.


Your new neck opening should look like this:
 
 
     Next, fold the cut side over to the non-cut side and cut around it to make both sides even. Cut across the bottom evenly to make a nice straight bottom. Then line up the front to the back at the shoulders and cut around the back so you have a front and back of the nightgown. Line up the shoulders with the right sides of the nightgown together pin the shoulders and stitch straight across> Just sew the shoulders right now (don't get too excited and sew anything else just yet).


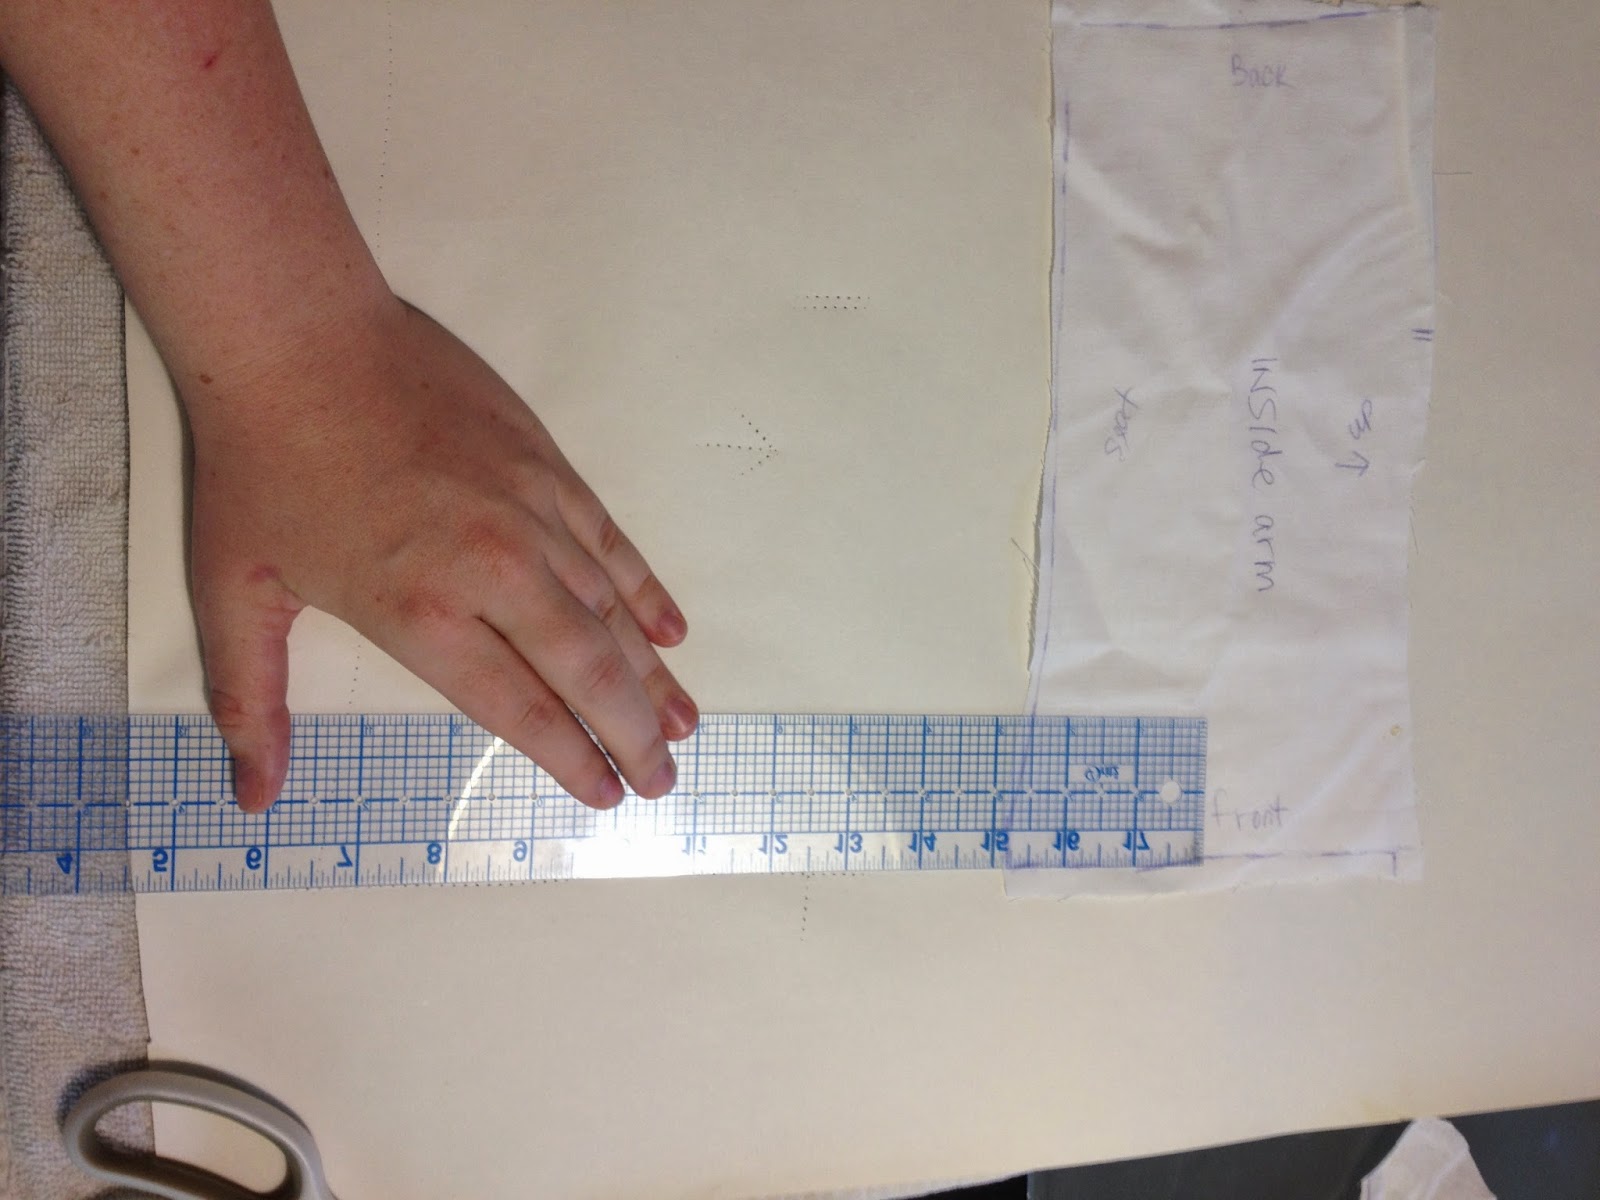
     Now on to the sleeves!!! The picture at the top left is the sleeve just as it was cut from the shirt with the folded edge pointing upward. Next place the child's nightgown sleeve on top of the shirt sleeve lining up the original edge of the sleeve this will once again help you because it will be less finishing at the end!!! Then pin down the child's sleeve so it stays in place. Flip the child's nightgown over so you can see the edge of the arm hole. Cut leaving 1/2" seam allowance. Note: your new sleeve should have this shape (bottom picture) and this is folded in half.
 
 
     Line your sleeve up. Start by placing the sleeve facing down (look at the finished edge if you get confused). Place a pin in the center of the sleeve matching it up to the center of the shoulder. Then also line up the side and center in between these two (third picture) Doing it this way gives you "landmarks" and then you can continue to go in between each of these pins until you have pinned the entire sleeve in the armhole. Sew this armhole opening. Tip: while pinning and/or sewing stretch the fabric and it will line up and lay flat against one another.
 
Your sewn arm opening should look like this. The side seams are not yet sewn.


Line up your sides and bottom of the sleeves with right sides together. They should line up like the picture on the left. Pin all the way down (right) and sew together.


     Go back to your scraps and cut off the finished edge of the original shirt. Leave a small amount above the original stitches when you cut. Line them up to the new nightgown and make sure you have just enough. Cut down to correct size if needed.   Next, pin the hem to the nightgown and stitch down on top of the original stitches.
 
 
TA-DA!!!


Now you can add details.... if you want..... or  maybe not?
Here's what I did:


     And there you have it!


Sunday, May 18, 2014

How To: Make Your Own Chair Slip-Cover

  
How To: Make Your Own Chair Slip-Cover
                       Before                                                                          After
 
 
      I don't know about you but at my house things can get messy from time to time. This tutorial I chose to do on a child's size chair but the principals are exactly the same for any chair or couch that you need to cover.
 
     I want to start by saying that this doesn't have to take you a long time to do and you can have professional results. Store bought slip-covers can be expensive and look little better than a sheet thrown over your chair or couch. To get a better fit you will want to make a pattern to fit your furniture exactly.
 
Let's Begin!  Start with plain cotton fabric. You can buy bleached or unbleached muslin or cotton from the fabric store or you can use an old sheet. A lighter color will be easier to mark on.
 
     Take a good look at all of the different shapes that your furniture has. Start with the easy shapes like squares and rectangles. Then comes the arms of the chair. Pin together the pieces and MARK EVERYTHING. If you have seen commercial patterns before you will know that notches keep all of your pieces lined up. For those of you who are not familiar you will need to make marks of where to line up each piece when you are sewing. They will look like hatch marks. Also write what the piece is right on the cloth. Mark arrows of which way faces where for example "Floor" and "towards arm or towards seat". You can use an ink pen or sharpie just take care you don't accidently mark up your furniture.
 
     Once you have all of your pieces figured out you will need to make your pattern pieces. These cloth pieces are not your pattern pieces in their current state. Even though you think they are straight and lined up they probably are not because even a true seasoned professional knows you must "true-up" the pattern.


You will need your cloth pieces, a ruler (I like to use a see-thru quilting ruler) a pencil, paper scissors and a roll of pattern paper or craft paper ( I got a roll of craft paper at Ikea). You obviously will also need your sewing machine and sewing supplies.
 
 
To make the paper pattern you need to trace your cloth pieces onto the paper.  Using a tracing wheel can be essential at this point. For a quick tip, place a towel under the paper to help the tracing wheel mark the paper. It is very important to use the towel because you could leave marks on your table from the tracing wheel.
 
After tracing out the cloth pieces remove the towel. If you try to trace the marks with your pencil (while the towel is under the paper) the paper will tear. LIKE THIS:
 
 
After you trace out all of your cloth pieces with the tracing wheel and then the pencil, then comes the straightening and matching process. Make sure you transfer all of your notches and comments onto the paper pattern piece.
 
 
Start by creating right angles and squaring up the pieces.
 
Double check measurements by referring back to the furniture.
 
 
Once your pieces are all squared up and evened out it is time to check measurements and notches. Start by lining up the pattern pieces as they will be sewn together. Match up the notches and measure any curved surfaces that would be hard to line up. Label anything you think will be necessary.


Once all of your paper pattern pieces match up and all of the notches line up it is time to cut out your fabric!!!! Now up to this point we haven't talked about seam allowance because basically you have made a pattern for exactly what your couch or chair looks like. You have two options. You can add an extra  around the pattern pieces on the paper, or you can use the width of your measuring tape to lay next to the pattern and then cut outside the tape.

TIP: When you cut out your paper pieces they may curl up on you. You can iron your paper pieces. Set your iron to NO STEAM and iron the paper face down. Do not leave the iron on the paper just lightly place the iron on the pattern piece and quickly run it back and forth. If you don't feel comfortable ironing the paper you can run the paper back and forth over the edge of a counter to straighten it out.

After you cut out the pieces you will need to line them up and pin them together. Then SEW!!
TIP: On corners use as many pins as you need to feel comfortable.
If you need to you can continue to refer back to the chair or couch to line up the pieces in case you get confused as to where things line up. Take all of the extra steps that you need to.


Finish sewing it all together.... and enjoy your lovely new slip-cover!!!!!
 
                    FROM THIS >>>>>>>>>>>>>>>>>>>>>>>> TO THIS!!!!